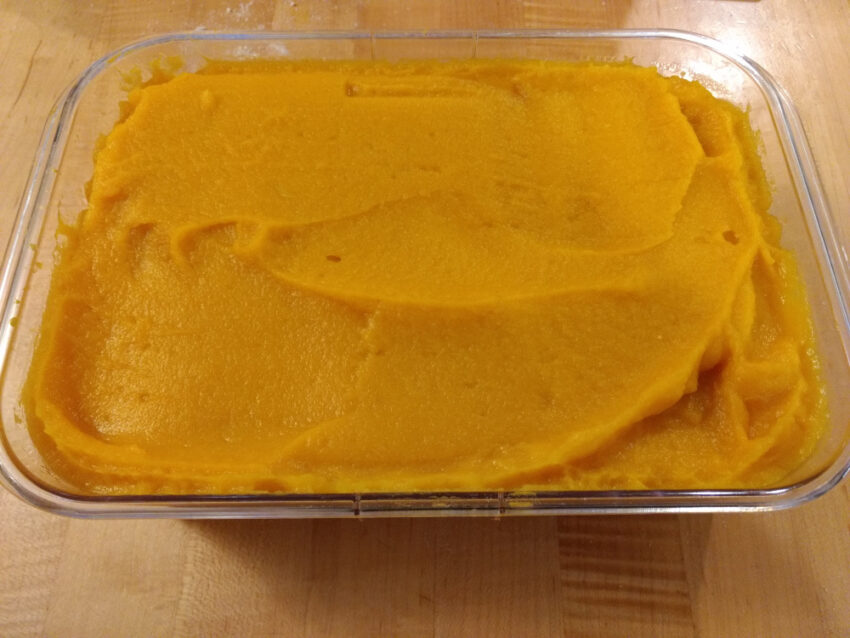
Apple Pie Bourbon Blondies

Redolent with brown butter and bourbon, moist and chock full of fruit, these bars are the best of butterscotch blondies and apple pie rolled in one–and would be delicious a la mode, I’m just saying.

Ingredients
Makes 9 good-sized blondies

  • 6 Tbsp unsalted butter
  • 1 medium apple (preferably a variety good for baking like granny smith)
  • 1 tsp neutral vegetable oil
  • 2 tbsp lemon juice
  • a pinch of cinnamon
  • 1/4 tsp salt + a pinch
  • 1 cup white flour (I used unbleached)
  • 3/4 cup packed dark brown sugar
  • 1/2 tsp baking powder
  • 1 egg
  • 3/4 tsp vanilla extract
  • 3 Tbsp bourbon

Preheat the oven to 350 F (175 C).

Peel the apple and dice into small cubes around 1/4-1/3 inch (7 mm). Butter or line with parchment a 8×8 square pan (a 9-inch cake pan will also work in a pinch).

To brown the butter, melt it in a small saucepan over medium heat. Continue cooking, swirling occasionally, until the butter is a nice medium-brown color (detailed instructions here). Remove from heat, transfer to a heat-proof container, and set aside to cool in the refrigerator or freezer.

Add the oil to the now empty pan and return it to the heat. Then add the diced apple, cinnamon, and a pinch of salt and stir, scraping the bottom to get any remaining brown butter solids mixed in. Saute for 3-5 minutes, stirring periodically. Then reduce to low heat and add the lemon juice, scraping the bottom of the pan really well. Continue cooking until the excess liquid has cooked away and then remove from heat and set aside.

In a medium bowl, combine the flour, sugar, baking powder and remaining 1/4 tsp of salt. Add egg, vanilla, bourbon, and brown butter (make sure it’s cooled enough to avoid cooking the egg) and use a spatula or wooden spoon to mix until the flour is mostly incorporated. Add the apples and mix well.

Bake for about 25 minutes. Until dry to the touch in the center and golden brown at the edge of the pan. They will be paler than regular blondies. Let cool completely in the pan (or at least 15 minutes), and then cut into squares. These are best eaten within a couple days.

Vegan Mapo Beans

vegan mapo beans

If there’s one thing I like, it’s variety. I’m not keen on eating the same thing all the time, and I like trying new recipes. I’m always on the lookout for interesting dishes and flavors to play with, so when I came across a recipe for beans in the style of mapo tofu, I was intrigued. Of course I don’t eat meat, so I tweaked it to create these vegan mapo beans! The finished product has a spicy, complex, savory flavor and a satisfying texture boost from the large white beans used in place of silken tofu.

Note that you must cook the beans from dry ahead of time.

Adapted from Serious Eats.

Ingredients
Serves 3

  • 1 1/4 cup large white beans, dry (should be labelled great northern, white kidney, cannellini, or baby lima beans)
  • 1 Tbsp coconut oil
  • 2/3 cup meatless grounds
  • A few drops to 1/2 tsp smoke seasoning (depending on the brand, it may be highly concentrated, or not so much)
  • 4 Tbsp vegetable oil
  • 1 1/2 Tbsp doubanjiang (Chinese fermented broad bean chili paste, may also be labelled as toban djan, and can be found at an Asian grocery or online–do not omit this)
  • 2 tsp ground Chinese chilies (Er Jing Tiao chilies, again online or Asian grocery–in a pinch sub 3/4 tsp cayenne pepper)
  • 4-5 garlic cloves, depending on size
  • 1.5-inch chunk of fresh ginger (about 3 tsp minced)
  • 5-6 scallions or about 16 ramps (about 3 oz)
  • 1 1/2 tsp ground Sichuan peppercorns, divided
  • 1 1/4 cups water

Prep

Cook the beans ahead of time, either on the stove top according to the instructions on the package, or in an instant pot as follows: cover the beans with a couple inches of water and cook on high pressure for  25 minutes. Natural release for 5 minutes, and then release the remaining pressure using the valve.

measured beans

Use a ladle to scoop 1 cup of the bean liquid and beans (roughly 50/50) into a 4-cup measure. Add 2 more cups of mostly beans and as much liquid as it takes to fill in the air space (to the 3-cup line). This should use most/all of the beans, and the remaining liquid can be discarded. Set aside the 4-cup measure for now.

Peel and mince the ginger and garlic. Trim scallions. Separate the hollow green parts of the scallions and coarsely chop them. Thinly slice the remaining white, solid part of scallions into a separate pile.

Get a small heat proof bowl and a ramekin (or smaller heatproof bowl) and set both next to the stove for later.

Cooking

In a large pot or wok, heat the coconut oil over medium-high heat. Add the meatless grounds, and brown, stirring and scraping the bottom of the pot often. Add the smoke seasoning and stir well. Scrape all of the grounds out into the small bowl and set aside. Remove pot from heat for a moment to cool down and reduce heat to medium.

prepared "meat" and chili oil

Add the vegetable oil to the pot and put back on the heat. Scrape the bottom pot well to loosen any browned on bits, and heat oil until it looks shimmery. Add dobanjiang and stir constantly for about 30 seconds or until fragrant. Add the Chinese chilies and continue stirring constantly for another 30 seconds, or until the oil is all dark red. Pour about 2/3 of this oil mixture into the ramekin and set aside.

Add the ginger, garlic, 1/2 tsp Sichuan peppercorn, and the white part of the scallions/ramps to the pot and cook for about 30 seconds or until nice and fragrant. Add 1 1/2 cups water and the beans you measured out earlier.

vegan mapo beans--final step

Bring to a simmer and cook for 3-5 minutes until everything is hot and the liquid has thickened slightly. Add the green part of the scallions/ramps and the meatless grounds, stir well, and cook for another 30 seconds or so until the greens are just softened. Note that it will continue to thicken as it cools.

Ladle stew into bowls, and if desired, sprinkle with some of the reserved ground peppercorns and chili oil. Serve vegan mapo beans with some rice or a vegetable dish on the side.

Salad Rolls (Gỏi Cuốn)

vietnamese salad rolls

Hailing from Vietnamese cuisine, salad rolls can include a variety of fillings and make for a delicious and healthy appetizer or light meal. This recipe is more a of a guide–the exact amounts aren’t important, and you can try different filling combinations of your own. I’ve included the core ingredients and a suggested set of additional flavors to get you started, along with a recipe for peanut dipping sauce. If I’m being honest, I love peanut sauce so much that the rolls themselves are sometimes more of a vehicle

Core Ingredients
Makes 6 salad rolls

  • 1/4 cup natural peanut butter (unsweetened)
  • 2 tbsp honey (preferably) or other sweetener such as sugar or agave
  • 1 tbsp soy sauce
  • 1 tsp sesame oil (optional)
  • Red chili flakes to taste
  • 6-12 bánh tráng (rice paper wrappers, in the Asian foods section of many grocery stores, or online)
  • A couple handfuls of lettuce (I usually use romaine, but you can use another type.
  • A handful of vermicelli rice noodles
vienamese salad roll wrappers

Suggested Ingredients (I like to pick a few veg/fruit, 1 protein, and 1 herb)

  • Half a cucumber, cut into spears
  • A small carrot, shredded or julienned
  • Half a ripe mango, sliced
  • A handful of mung bean sprouts
  • Half an avocado, sliced
  • 6 oz firm tofu (about half a package, in the US), drained and sliced
  • 6 oz smoked or baked tofu, sliced
  • 6 oz tempeh, sliced
  • 12 precooked shrimp, peeled
  • 4 oz barbeque pork, thinly sliced
  • A small bunch of Thai basil, de-stemmed
  • A small bunch of cilantro, de-stemmed

To make the peanut sauce:

Measure peanut butter into a small microwave-safe bowl. Microwave on medium power for a few seconds at a time until softened–do not cook it beyond just being softened as it will change the flavor and texture. Add remaining ingredients and stir well. Set aside. The peanut sauce can be made ahead and will keep for a week in the fridge.

Salad roll prep:

Follow the instructions on the package to cook the vermicelli and set aside.

Wash your chosen fillings vegetables and prepare the vegetables (see suggestions in recipe list). Chop or tear the lettuce into medium pieces and then wash. Set each component aside in a little pile or bowl.

Find a flat dish or pan that is slightly larger than the wrappers you’re using. Put about an inch of boiling hot water into the dish and let sit until cool enough to touch. Have a large plate or cutting board ready next to it.

Salad roll assembly:

One at a time, submerge a wrapper in the dish of water, wetting every part of it. Remove immediately and shake off excess water. Lay it out flat on the cutting board. If desired, for a thicker and sturdier layer of rice wrapper, you can use a double layer.

If using square wrappers (I find these easier to work with), place fillings in a long line a couple inches from one side. If using round ones, place the line more in the middle. Either way, leave a little on either end. Use a large proportion of lettuce and vermicelli and a smaller proportion of the other fillings. Exact amounts don’t matter–it just has to fit when you roll it up. You’ll get a feel for it as you go.

Fold the short edges of the wrapper in over the filling and then, starting at one long edge, pull the edge up over the filling and roll tightly to the other edge, using your fingers to press into the seam and make sure the ends don’t unfold. Take your time and roll as tightly as you can without tearing the rice paper. Your first few might look really messy but you’ll get better (and anyway, they’ll taste the same). The wrapper will stick to itself, helping to keep them sealed once rolled.

Serving:

Vietnamese salad rolls are best eaten fresh, but leftovers can be kept for a day in the fridge. If making the peanut sauce ahead, allow to come to room temperature before serving.

Note: Unless you’re very good at filling and rolling them tightly, I recommend leaving them whole rather than cutting in half to serve.

Brown butter

finished brown butter

If you’ve spend much time perusing recipes books, food magazines, or blogs, you’ve no doubt heard brown butter mentioned. Brown butter is one of those magical flavors that improves nearly everything. Here’s how it’s made and some facts about it.

How to Make It

Take your butter and place it in a pan over medium heat. It will pop and sizzle a bit while the water cooks off, so I recommend a small saucepan rather than a frying pan, or using a splatter guard like you’d use for deep frying.

As the butter cooks, the solids will fall out to the bottom of the pan, where they will brown, so don’t stir it. However, you can swirl it in the pan periodically to help it brown evenly–this is also a great way to check the color if it gets too bubbly. When it gets to a nice nutty brown color, remove from the heat immediately and pour into a heat-proof container.

How to judge the color? Well, depending on the depth of the liquid in your pan, it may appear somewhat darker or lighter. So look for the solids at the bottom to be nice and brown, but not blackened (see the pictures below)!

Be sure to use a heat-proof spatula to scrape out any remaining solids and get every last drop of that buttery goodness.

Important Notes

Do not walk away while cooking the butter, especially once the color starts to change. It goes from lightly brown to perfect to burned quite quickly.

If you’re substituting brown butter for regular butter or oil in a recipe, it is important to recognize that the process of browning removes much or all of the water contained in butter. The total volume will be reduced, and the moisture content will be less than that of regular butter. Adjust accordingly.

Some recipes suggest browning butter at a higher heat; I choose not to because it splatters a lot that way.

Vegan “Chicken” Soup

vegan "chicken" soup

Sometimes there’s just nothing like chicken soup, especially when it’s chilly outside or you’re coming down with a cold. Warm, mellow broth and classic ingredients combine for a dose of liquid comfort. This vegan “chicken” soup recipe’s got everything but the bird and it’s a breeze to make!

Ingredients
Serves 4

  • 1 tbsp olive oil
  • 3/4 tsp salt
  • 1/2 tsp dried rosemary
  • 1 large bay leaf
  • 2 medium celery stalks
  • 3-4 medium carrots
  • 1/4 medium yellow onion
  • 3 medium garlic cloves
  • 6 oz baked or extra-firm tofu (about 1.5 cups when cubed)
  • 6 tbsp nutritional yeast flakes
  • 1 tsp liquid aminos (such as Bragg’s, or sub soy sauce)
  • handful farfalle (bow tie) or other pasta (optional)

Wash and trim the ends of the carrots and celery. Slice about 1/4 inch (2 cm) thick. Trim end of onion and garlic cloves and peel off papery skin. Thinly slice garlic and coarsely chop the onion.

In a 3-quart pot with a lid, add 5 cups water along with the salt, oil, rosemary, and bay. Cover and bring to a boil. Add all the vegetables and then return to a boil. Cover again and cook for 8-10 minutes, or until the carrots start to soften.

Meanwhile, drain and dice the tofu into about 1/2 inch (a generous cm) cubes. After the 8-10 minutes is up, add the tofu, aminos and yeast, and stir. Bring back to a boil and add the pasta. Cook for the length of time directed by the pasta’s packaging, or until al dente, and remove from heat. Ladle the vegan “chicken” soup into bowls and serve hot!

Avocado Toast

Avocado toast basically it does what it says on the tin, and memes aside, it’s great. Satisfying and nutritious any time of day, whether as a snack or a meal. You can cook the eggs any way you want to–poached, fried, sunny-side up. Fried is easiest, and poached is hard mode. No one likes poaching eggs…do they?

Ingredients:
Makes a snack for 2 or a meal for 1

  • 1 small avocado
  • 2 slices of bread (I like whole grain)
  • 2 eggs
  • Salt
  • Pepper
  • Oil or butter for the pan

Toast the bread and put aside on the plate(s). Half the avocado and remove the pit (tips on this here). Slice the fruit inside from top to bottom, being careful not to poke the knife through the skin. Scoop the slices out with a spoon and spread across the toast. Sprinkle a little salt and pepper over the avocado.

To fry the eggs, heat a small pan over medium heat. Add a little oil or butter and crack the eggs in. Sprinkle a little salt and pepper over the eggs. Cook them however you like them. I like to cook them until the whites are firm and the yolks are still runny. The easiest way to do this is to cook until the whites set, then flip and cook for another 10-20 seconds. You can also do this without flipping if you want them to look like they do in the picture, but you will have to use lower heat. Separate the eggs and place one on each slice of avocado toast. Enjoy with a fork and knife!

Toasting Nuts & Seeds

chopped pistachio nuts

Toasting raw nuts and seeds can enhance their flavor, aroma, and texture. Toasting is easy and doesn’t take very much extra time, but it can have a big impact on the finished product! Here I have provided a basic guide for your reference.

To toast nuts in the oven:

Preheat your oven to 350 F (175 C). Spread nuts evenly on an un-greased cookie sheet. Place on the middle rack and bake 5 minutes. Stir and bake for another 3-7 minutes, or until aromatic and VERY lightly browned. Do not walk away from the nuts while you’re toasting–they will burn quickly. Remove pan from oven and allow to cool.

Toasting seeds on the stove:

Heat a pan over medium heat and add seeds (do not use oil). Stir frequently and cook until just aromatic (a few minutes). Do not take your eyes off them–they will burn even quicker than the nuts do in the oven. Remove from pan and allow to cool.

You might also toast seeds in the oven sometimes, such as with these garlic-herb pumpkin seeds, but it’s often convenient to toast smaller seeds in a pan because they toast so quickly.

So go on, get toasting!

100% Fruit Compote

wholewheat sourdough waffle with 100% fruit compote

Compote–a dish of stewed fruit–is great with things like yogurt, pancakes, waffles, ice cream, etc. This version, 100% fruit compote, eschews the usual sugar syrup. It’s exceedingly easy and uses raisins to enhance the sweetness behind the scenes.

Ingredients
Makes around 2 cups

  • 1 1/2 lbs frozen berries or stone fruit (pitted)
  • Small handful raisins (2-3 Tbsp)

Put the frozen fruit in a small sauce pan over medium heat. While the fruit is thawing, mince the raisins. Add the raisins to the fruit.

When the fruit has softened and has liquid around it, bring to mixture to a simmer. Cook for about 20 minutes, or until fruit just starts to lose its structure and the liquid thickens slightly.

Remove from heat and either serve your 100% fruit compote immediately or cool and store in an airtight container in the fridge for up to several days.

100% fruit compote

Hearty Wholegrain Pancakes

hearty wholegrain pancakes

My hearty wholegrain pancakes are my go-to American pancake recipe for everyday breakfasts because they’re fully wholegrain and don’t have any added sugar in the batter. The only downside (if you can call it that) to them is that they soak up lots of maple syrup, but if that’s not what you want they’re also delicious served with this 100% fruit compote instead.

Pancakes are also a nice way to start easing yourself into the realm of baking. They cook on the stove top not the oven, so they aren’t technically baking, but you can think of them as baking lite. They’re very forgiving and you can practicing mixing up some batter and using leavening. This recipe in particular is very flexible. The oil can be omitted entirely, if desired. You can add few Tbsp of sugar if you want them lightly sweetened. You can use water or milk or a non-dairy beverage. And any number of tasty mix-ins (see my suggestions below) could be added to spice them up.

Ingredients
Makes 10-12 3″ pancakes

  • 1 cup rolled oats (quick-cook oats are also fine)
  • 1 cup whole wheat flour
  • 1 tsp baking soda
  • 1 tsp baking powder
  • 1/2 tsp salt
  • 2 eggs
  • 1 1/2 cups water or milk of choice
  • 1 tsp vanilla
  • 2 tbsp vegetable oil
  • 1/2 cup unsweetened shredded coconut (optional)
  • Fresh or frozen blueberries, blackberries, and/or currants (optional)
  • Coarsely chopped pecans or other nuts (optional)

Combine the dry ingredients (and coconut, if using) in a medium bowl. Add the wet ingredients and whisk until combined, but try not to over mix.

Heat a large skillet over medium-low heat. Add a tablespoon or so of oil or butter and use a thin spatula to spread it around. Add batter to the pan by the 1/3 cupful, a few inches apart. If adding any nuts or fruit, sprinkle them onto wet pancakes now.

Cook until the top side of the pancake looks dry around the edge and about half way into the center, and the bottom is golden brown. Flip with your spatula and cook until the other side is golden brown.

To keep the hearty wholegrain pancakes hot while you’re finishing up the rest, put an oven-safe dish on the middle rack and set the oven “warm” or the lowest temperature setting. As you add pancakes, keep the dish covered with a bit of foil or another dish inverted over the first so they don’t dry out.

Cupboard Curry

a bowl of cupboard curry

There are many, many kinds of curry. This one is very simple and makes a great weeknight dinner. You need a few core ingredients, and the rest can be decided based on what you have in your cupboard. Thus, cupboard curry! I’m especially fond of using root vegetables, peas, greens, and cauliflower.

Ingredients
Serves 3-4.

  • 1 tbsp coconut oil
  • 1 15 oz can of coconut milk (regular or light is fine, but don’t use coconut cream)
  • 1.5-2 tbsp curry powder
  • 1-1.5 tsp salt
  • 1-2 bay leaves
  • 1 medium onion, diced (preferably white or yellow)
  • 3-4 cups chopped vegetables of choice, for example:
    • cauliflower and/or broccoli, diced
    • carrots, sliced
    • yams or potatoes, diced
    • frozen peas
    • spinach
    • kale, torn into large pieces and stemmed
    • bell peppers, chopped
    • canned tomatoes, drained or fresh tomatoes, chopped and seeds removed
    • eggplant, diced
    • okra, sliced
  • About a cup of protein of choice (optional), for example:
    • cooked or canned chickpeas, drained
    • extra-firm or firm tofu, drained and cubed
    • chicken breast, precooked and chopped
  • Parsley to garnish (optional)

Once you’ve washed and chopped the onion and your chosen ingredients, heat a wide pot or a deep pan over medium heat. Melt the coconut oil in the pan and then add the onion, stirring now and again, until it is just becoming translucent.

If using peas or leafy greens, set these aside for later. Add the hardest vegetables you’re using (e.g carrots and potatoes) and spices to the pan. Use the smaller measurement of salt and curry powder. Saute for a couple more minutes. Add the medium-firm vegetables (e.g. yams, cauliflower, eggplant, peppers), protein of choice, and canned tomatoes, if using and saute a few more minutes.

Add the coconut milk. Fill the empty can halfway with water and add that to pan as well. Add the peas, if using. Stir well and cover pan. Bring to simmering and cook for about 15 minutes.

pot of curry

Taste the sauce and add the additional salt and curry, if desired. If the sauce is thicker than you would like, then add a little extra water. If it’s thinner than you would like, uncover and continue simmering, stirring frequently. Either way, continue cooking until the hardest vegetables are soft enough to be cut in half with a spoon. If using leafy greens, add them now and cook for 1-2 minutes. Otherwise, remove pot from heat.

Serve the delicious cupboard curry hot and garnish with parsley, if desired. Also excellent served over rice or with naan!