Guacamole

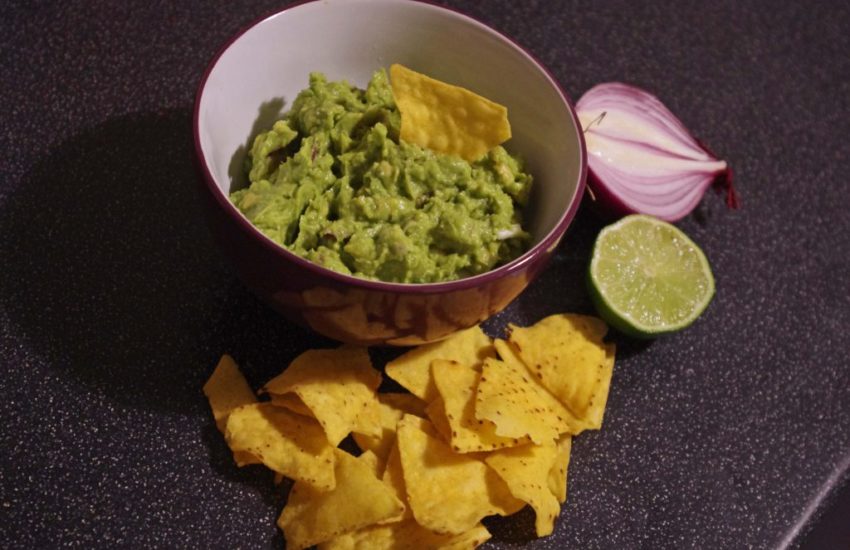
Guacamole dates back to the Aztec Empire, and to this day it continues to make the world a better place. It’s a part of Mexican cuisine and has become part of American cuisine as well. Delicious served with Mexican dishes, or simply eaten on tortilla chips in mass quantities, it’s healthy and super easy to make. You can use this recipe as is, or use it as a base and choose your own add-ins. For example some like to add tomatoes, peppers, or sour cream to their guac, but I prefer it plain or with a little cilantro.

Ingredients
Makes about 4 cups.

  • 4 large ripe avocados (or 6 small ones)
  • 1 lime
  • 1/2 of a medium red onion
  • 1-2 cloves of garlic (optional)
  • 1/4 cup chopped cilantro (optional)
  • salt and pepper to taste

Dice the onion into small pieces, and crush or mince the garlic, if you’re using it. Juice the lime into a small dish and remove any seeds. Cut the avocados lengthwise and remove the pit.
Note: if you’re not sure how to do this safely and easily, check out this post.

Mashing avocados

Scoop the flesh from the avocados with a spoon and mash them in a bowl using a fork until there are only small chunks left. Add the lime juice, the onion, and any optional ingredients and mix well.

Make sure you don’t let the avocados sit too long without adding the lime juice because the acid in the lime helps slow the oxidation of the avocados (oxidation is what makes them turn brown). Add a little salt and pepper, to taste. Keep in mind that if you’re serving it with salty chips you don’t need much salt in the guacamole itself.

To store, keep in an airtight container in the fridge. Press a piece of plastic wrap down onto the surface of the guac before closing the container. It will stay nice this way for a few days, but if the top layer goes brown you can just mix it in or scrape it off and eat the green part underneath.

All About Avocados

Avocados are incredibly versatile and delicious eaten raw or cooked. You can enjoy them with a spoon straight out of the skin, slice and eat ’em in a sandwich or omelette, bake it, sauté it, mash it to make guacamole, use it in baked goods, or puree it to make sauces, smoothies, and even ice cream!

Ripeness & Selection

You often can’t find ripe avocados in the store, but they do ripen after being picked, so you can let them ripen at home if you buy them in advance of when you want to use them. Significantly under-ripe avocado is not so awesome.

When picking them out, you want to make sure there aren’t any soft spots (uniformly soft all over is good, soft or dented in one spot is not good) or mold around the stem.

You can tell when an avocado is ripe by giving it a very gentle squeeze; they should feel soft, but not squishy. Once ripe, they only keep well for a few days, so put them in the fridge asap if you can’t use them right away.

If there are some brown spots inside when you cut one open, just scoop them out with a spoon and use the rest, but if the most of all of the flesh is brown, just have a good cry and then throw it away.

Preparation & Use

You usually want to cut avocados lengthwise (from top to bottom), turning the fruit as you cut so as to cut all the way around the pit. You can then twist the two halves in opposite directions to separate them. The trickiest part of cutting avocados is removing the pit in a safe manner. You may think I’m being dramatic, but lots of people have wound up in the emergency room because they couldn’t handle their avocado properly. If you don’t believe me Google “avocado hand”.

The safest way to remove an avocado pit is with a spoon–you can also use a knife, to avoid marring the flesh, but if you’re going to, do NOT use the tip of the knife to dig the pit out! Carefully lodge the knife in the exposed part of the pit by bringing the knife down level in a shallow tapping motion and then twist WITHOUT pushing down so that the pit rotates sideways, again, keeping your knife level. As in the GIF below.

Removing an avocado pit GIF
How to remove an avocado pit

Also be very careful removing the pit from the blade! It will be very slippery. If necessary, use a fork to push it off.

You can use a spoon to separate the flesh from the skin, before or after slicing it. If you slice the flesh first, use very little pressure to ensure the tip of your knife only slides along the inside of the skin, and does not poke through into your fingers.

Melting Butter and Chocolate

Many recipes will require melting butter or chocolate. This isn’t terribly complicated, but both substances can be temperamental in similar ways, so this post will give you a quick rundown of how to keep things from going awry.

Stove Top

Chocolate is best melted using a double boiler. This allows more careful control of the temperature and rate at which it heats, which can help prevent seizing and is also useful if you’re tempering the chocolate. Take care not to get any water from the pot into the bowl–this can also cause it to seize.

Low heat in a little sauce pan is a good way to melt butter (if you use higher heat or keep it on after it’s melted, you might wind up with brown butter, which is pure magic but not necessarily what you want for everything).

Microwave

The above methods are more careful, but to be honest, I usually can’t be bothered. I usually use the microwave for melting butter and chocolate. This is a little iffier, but usually works out if you go about it cautiously. Butter especially likes to explode all over the inside of the microwave if it gets too hot too fast, and chocolate if over heated goes all grainy and thick again. Note that if you are trying to temper chocolate, you definitely need to go with the double boiler.

So first step is to figure out how to set your microwave to low or medium-low power (don’t go above 50% power as a general rule of thumb, but the exact settings will vary depending on the wattage). Start with a short amount of time, such as 10-15 seconds. It also helps to get butter as close to room temp as possible before melting it in the microwave. As you continue, and the ingredient gets hotter, the time should only get shorter. Every time you check it, give it a quick stir to make sure it’s heating evenly and, in the case of chocolate, not getting grainy. If you have only a small amount of solid butter/chocolate remaining, just take it out and stir until the heat already present in the food melts the rest.

Above all else, DON’T GET DISTRACTED and walk away while melting butter or chocolate.

Working with Yeast (and Troubleshooting)

Yeast is a total diva; everything must be just so, or it will throw a tantrum and refuse to go on. However, it is essential to many baked goods and other fermented products. Yeasts are single-celled fungi. There are different varieties of live yeast used in cooking to make different things like bread, pastries, wine, and beer. They consume sugars and produce carbon dioxide and alcohol. When that’s happening inside your dough, the CO2 forms little air bubbles that cause your dough to rise, and can create excellent texture and flavor. Nutritional yeast and yeast extracts are also used in cooking, but are inactive and used only to add flavor and nutrients.

Generally in baking, there are a few ways to leaven (add a rising agent to) batter or dough often this is done with either chemical leavening or yeast (although some things rise because of steam and/or eggs). Most of the time, for the latter option, you will use active dry or instant yeast, which are usually interchangeable, although they make take different amounts of time to proof initially. It can be bought in a jar, a compressed cake, or in pre-measured packets.

Dry Yeast

instant dry yeast

Dry yeast usually needs to be proofed before you use it. This is often done by putting it into a warm liquid with some sugar content and letting it sit for a few minutes until the yeast activates and starts doing its thing. Too hot, however, and it will die! The liquid should be lukewarm (or even room temperature, although it will take longer to activate this way).

A good way to test if something is lukewarm without a thermometer, is to put your finger in the liquid. If it is lukewarm, it should feel as though it is the same temperature as your body; neither warm nor cold to the touch. If it’s too old, will also work less effectively, as it dies off gradually the longer it’s stored. To slow down this process, you should store your dry yeast in the fridge or freezer.

Troubleshooting

If your yeast fails to get frothy in the initial proof, there are a couple of things you can try. First, add a little more to your liquid along with a little bit sugar (perhaps a teaspoon, depending on the volume of the mixture). Let sit for another 10 minutes. If there are still no bubbles, throw it out and try again, making doubly sure that your liquid is not too hot. If you still don’t get any bubbles, your yeast might just be too old (or otherwise dead). Buy some fresh stuff and try again.

Naturally-Occurring Yeast

Sometimes, instead of adding it, you can cultivate naturally-existing yeast. This is the mechanism by which sourdough is made. This process requires more patience, but yields its own unique results and can be quite an interesting project! I will talk more about this in another post.

Food-Safety Basics

There are many things to consider when thinking about the food-safety basics. Allergies, intolerances, and dietary restrictions are very important, and vary widely from one person to the next. Be mindful of cross contamination when you’re dealing with these concerns. Follow the advice of your physician, and when you’re cooking for others, communicate with them to ensure you’re meeting everyone’s needs.

It should be noted that physical and chemical contaminants can also be dangerous, but this post will focus on the organic side of things.

DISCLAIMER: This is the advice I follow at home. These are my personal, not professional, opinions and I cannot guarantee anyone’s health. For more, better information, check out the recommendations of your local health authority.

Food Poisoning

The risk of food poisoning can be minimized through good food-handling practices, and his post provides some context for food-safety basics at home. Take it with a grain of salt and continue to gather information so you can make your own informed decisions.

Bacteria can come from a variety of sources and is usually present to some extent in our food. Bacteria can be removed by washing, or killed by things like heat or disinfectants, and its growth can be slowed or inhibited by refrigeration, freezing, and various other methods of preservation. Different types of bacteria have different levels of concentration (how many organisms are in the food) at which they cause illness. For some it’s very low, and others are relatively high. For this and other reasons, some kinds of food are considered high risk, and others low risk. Meats, dairy, and cooked rice are especially high risk foods, and things like fruit, vegetables, bread, dry goods, and preserved goods are low risk. High risk items should always be kept refrigerated and shouldn’t be kept if they’ve been left at room temperature for more than a short period of time.

Good Practices

There are a lot of things you can do to help keep your kitchen hygienic. You should always wash your hands before you start cooking or handling food. Wash them again after handling raw meat, unwashed produce, raw eggs, or when returning to the kitchen. If you prepare meat in your kitchen, and especially if you use plastic (as opposed to wood) cutting boards, use a separate cutting board for raw meat that isn’t used for anything else. Raw meat should always be kept separately from other ingredients and handled with different utensils than cooked food or other ingredients.

Different foods require different cooking temperatures and times to kill bacteria all the way through. I’m not going to try to list them here as you can easily search for this information. It’s nice to have a good cooking thermometer for times when you’re cooking thick cuts of meat, or trying to get a dish to an exact temperature for safety or precision, but much of the time you might not need to be that precise.

Raw Foods

Some people choose to consume raw or partially cooked eggs and meat in certain situations, and that’s your choice to make. Solid cuts of meat or fresh fish can sometimes be eaten rare or raw. Poultry and composite meats (e.g. sausage or hamburger), however, should never be eaten rare! Poultry has very porous flesh and things like hamburger have been ground up and mixed together—in both cases, this allows bacteria to penetrate into the center of the meat where it won’t be cooked fully if eaten rare.

Relatively fresh eggs that have been handled properly are sometimes consumed raw, but it is still safest to cook or pasteurize them. You should do your own research on this if you’re not sure how you feel, and you should allow other people to make their own decision by telling them what’s in the food you’re serving them.

In general, you shouldn’t wash eggs. If they’re washed at the wrong temperature it can cause the membrane inside the shell to contract and draw contaminants into the egg. In some countries (such as the US), eggs come pre-washed and must be refrigerated because the outer coating of the shell has been stripped away. In many other countries, they are not washed and can be stored at room temperature.

Fresh fruits and vegetables should always be washed (or peeled) to remove pesticides, bacteria, and other contaminants from the skin. Fresh produce doesn’t necessarily require refrigeration, but anything that has been cooked, pre-cut, or peeled should go in the fridge.

Illness

If you have been ill with vomiting or diarrhea recently you probably shouldn’t cook for anyone other than yourself. If you have a skin infection or open wounds on your hands, you should make sure they’re fully covered with a waterproof bandage before you cook anything. And, of course, wash your hands before handling food and be sure to cover your cough/sneeze.

There are many other considerations in the subject food safety. These guidelines are just a few food-safety basics that might help you start thinking about good hygiene in the kitchen if you’re new to cooking.

Whew! You made it all the way through! Next, you can think about stocking your pantry with this article!

Stocking Your Pantry – The Basics

As you cook more, you’ll probably figure out which things you consider essential or helpful to keep on hand. For the raw beginner, I’ve created a list with some basic ingredients to get you started stocking your pantry. The majority are non-perishable items with long shelf-lives.

Staples

  • Fruit and vegetables that you like
  • Rice (I like brown rice as my go-to)
  • Lentils (if you’re not sure what kind, get green lentils)
  • Canned beans
  • Canned tomatoes (e.g. diced)
  • Pasta/noodles
  • Nut butter
  • Eggs
  • Milk (dairy or non-dairy, whatever you use most often)
  • Onions (my go-to are yellow)
  • Garlic
  • Bread
  • Olive oil
  • A neutral-flavored vegetable oil such as sunflower, canola, or soybean
  • A solid fat such as coconut oil, butter, or margarine

Seasonings

  • Salt
  • Black pepper (get whole peppercorns and a grinder for best flavor)
  • Rice vinegar
  • Soy sauce and/or liquid aminos
  • Sesame oil
  • Some savory spices you enjoy (not sure? start with some basil, oregano, a medium curry powder, chili powder and/or cayenne, paprika, cumin, garlic and/or onion powder, and bay leaves)

Stocking Your Pantry For Baking

  • Unbleached white flour
  • Whole wheat flour
  • Granulated sugar
  • Light brown sugar
  • Confectioner’s sugar
  • Baking soda
  • Baking powder
  • Salt
  • Dry active yeast
  • Pure vanilla extract (imitation is cheaper, but it’s just not the same)
  • Some spices/extracts you enjoy (not sure? start with ground cinnamon, ground nutmeg, ground ginger, and almond extract)

Notes

A couple things to keep in mind:

Pantry essentials look vastly different depending what cuisine your work in most, and depending on your tastes and dietary restrictions. This is a very loose guide based on how I usually cook, and is intended to be customized heavily as you get your bearings.

You definitely do not need to purchase everything in one go, and many of these things will last a long time. Sure, that vanilla extract might seem expensive, but you’ll make many numerous things with that one bottle.

Next, brush up on some of the basics of good food hygiene with this article!